basil and panko crusted halibut, wheatberries w/ avocado and basil puree

IMG_3767


Wheat berries w/ avocado and basil puree
If you wanted to have a vegetarian night just saute up some veggies (zucchini, squash, mushroom, onions, tomatoes) and serve with the wheat berries for a delicious, hearty meal!IMG_3759

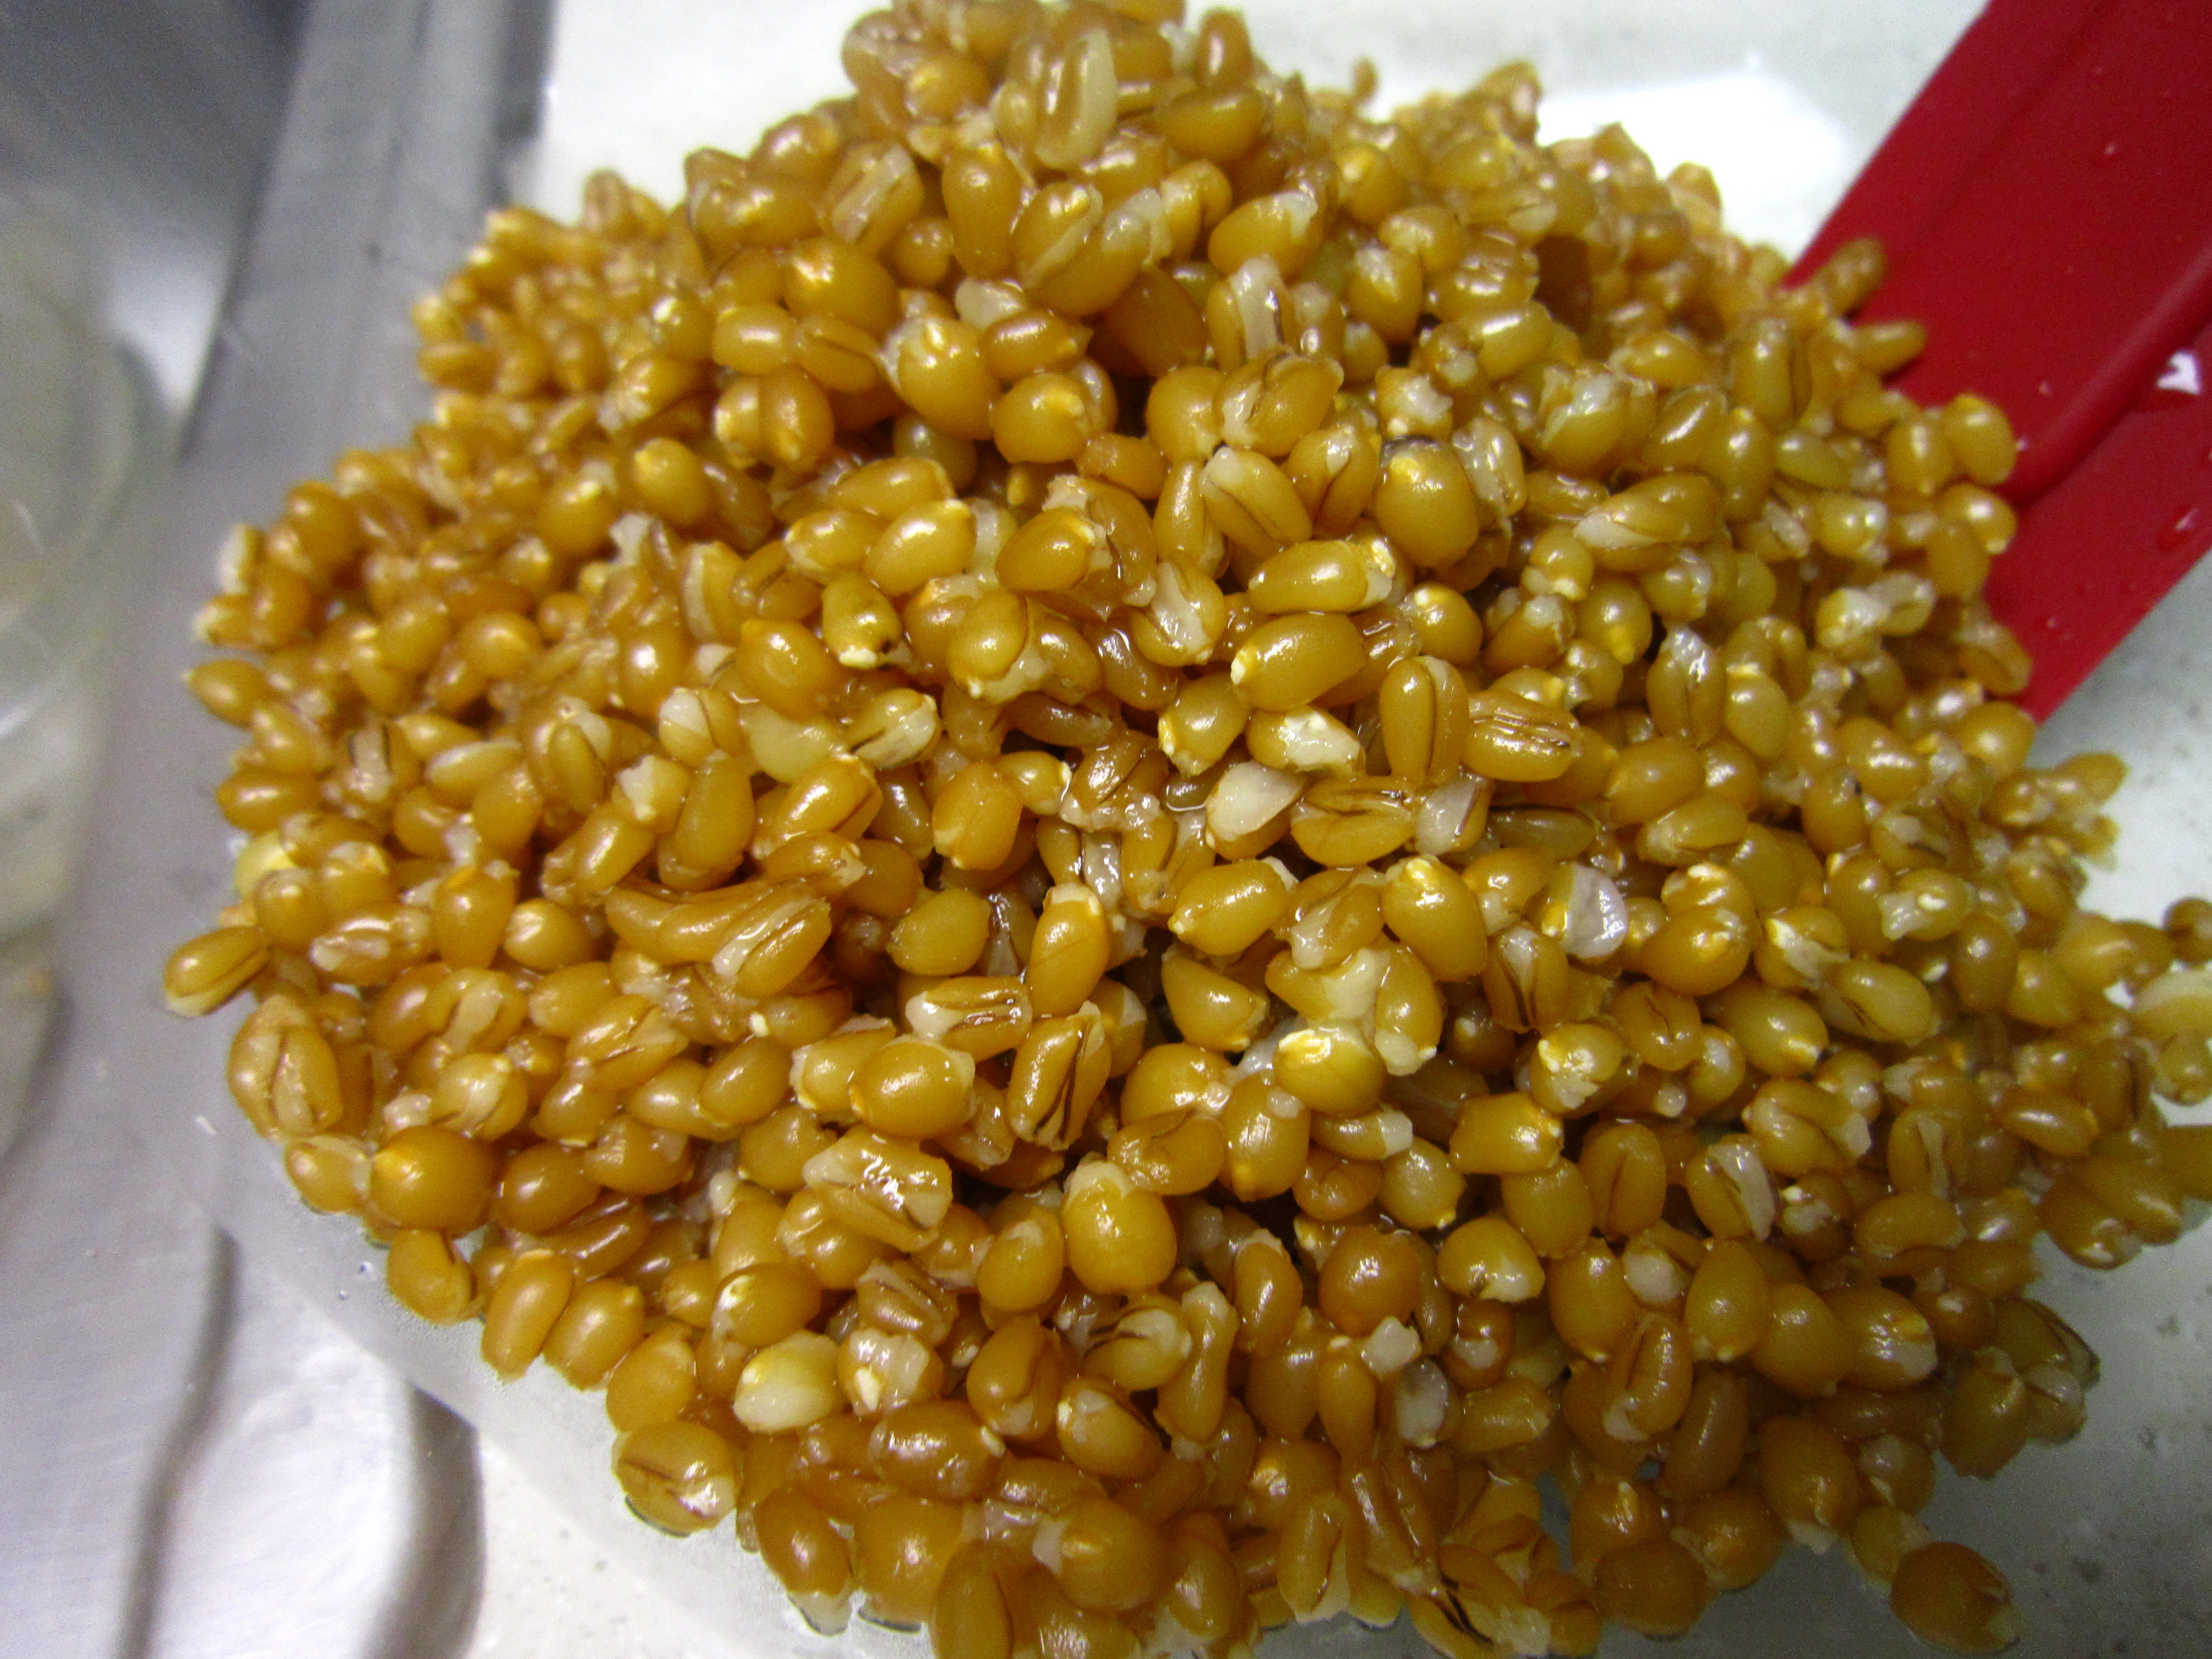
2 cups uncooked wheat berries

  • You can substitute the wheat berries for farro or brown rice, but don’t forget to alter the amount of liquid you use and the cooking time

2 1/2 cups chicken or vegetable broth
2 1/2 cup water
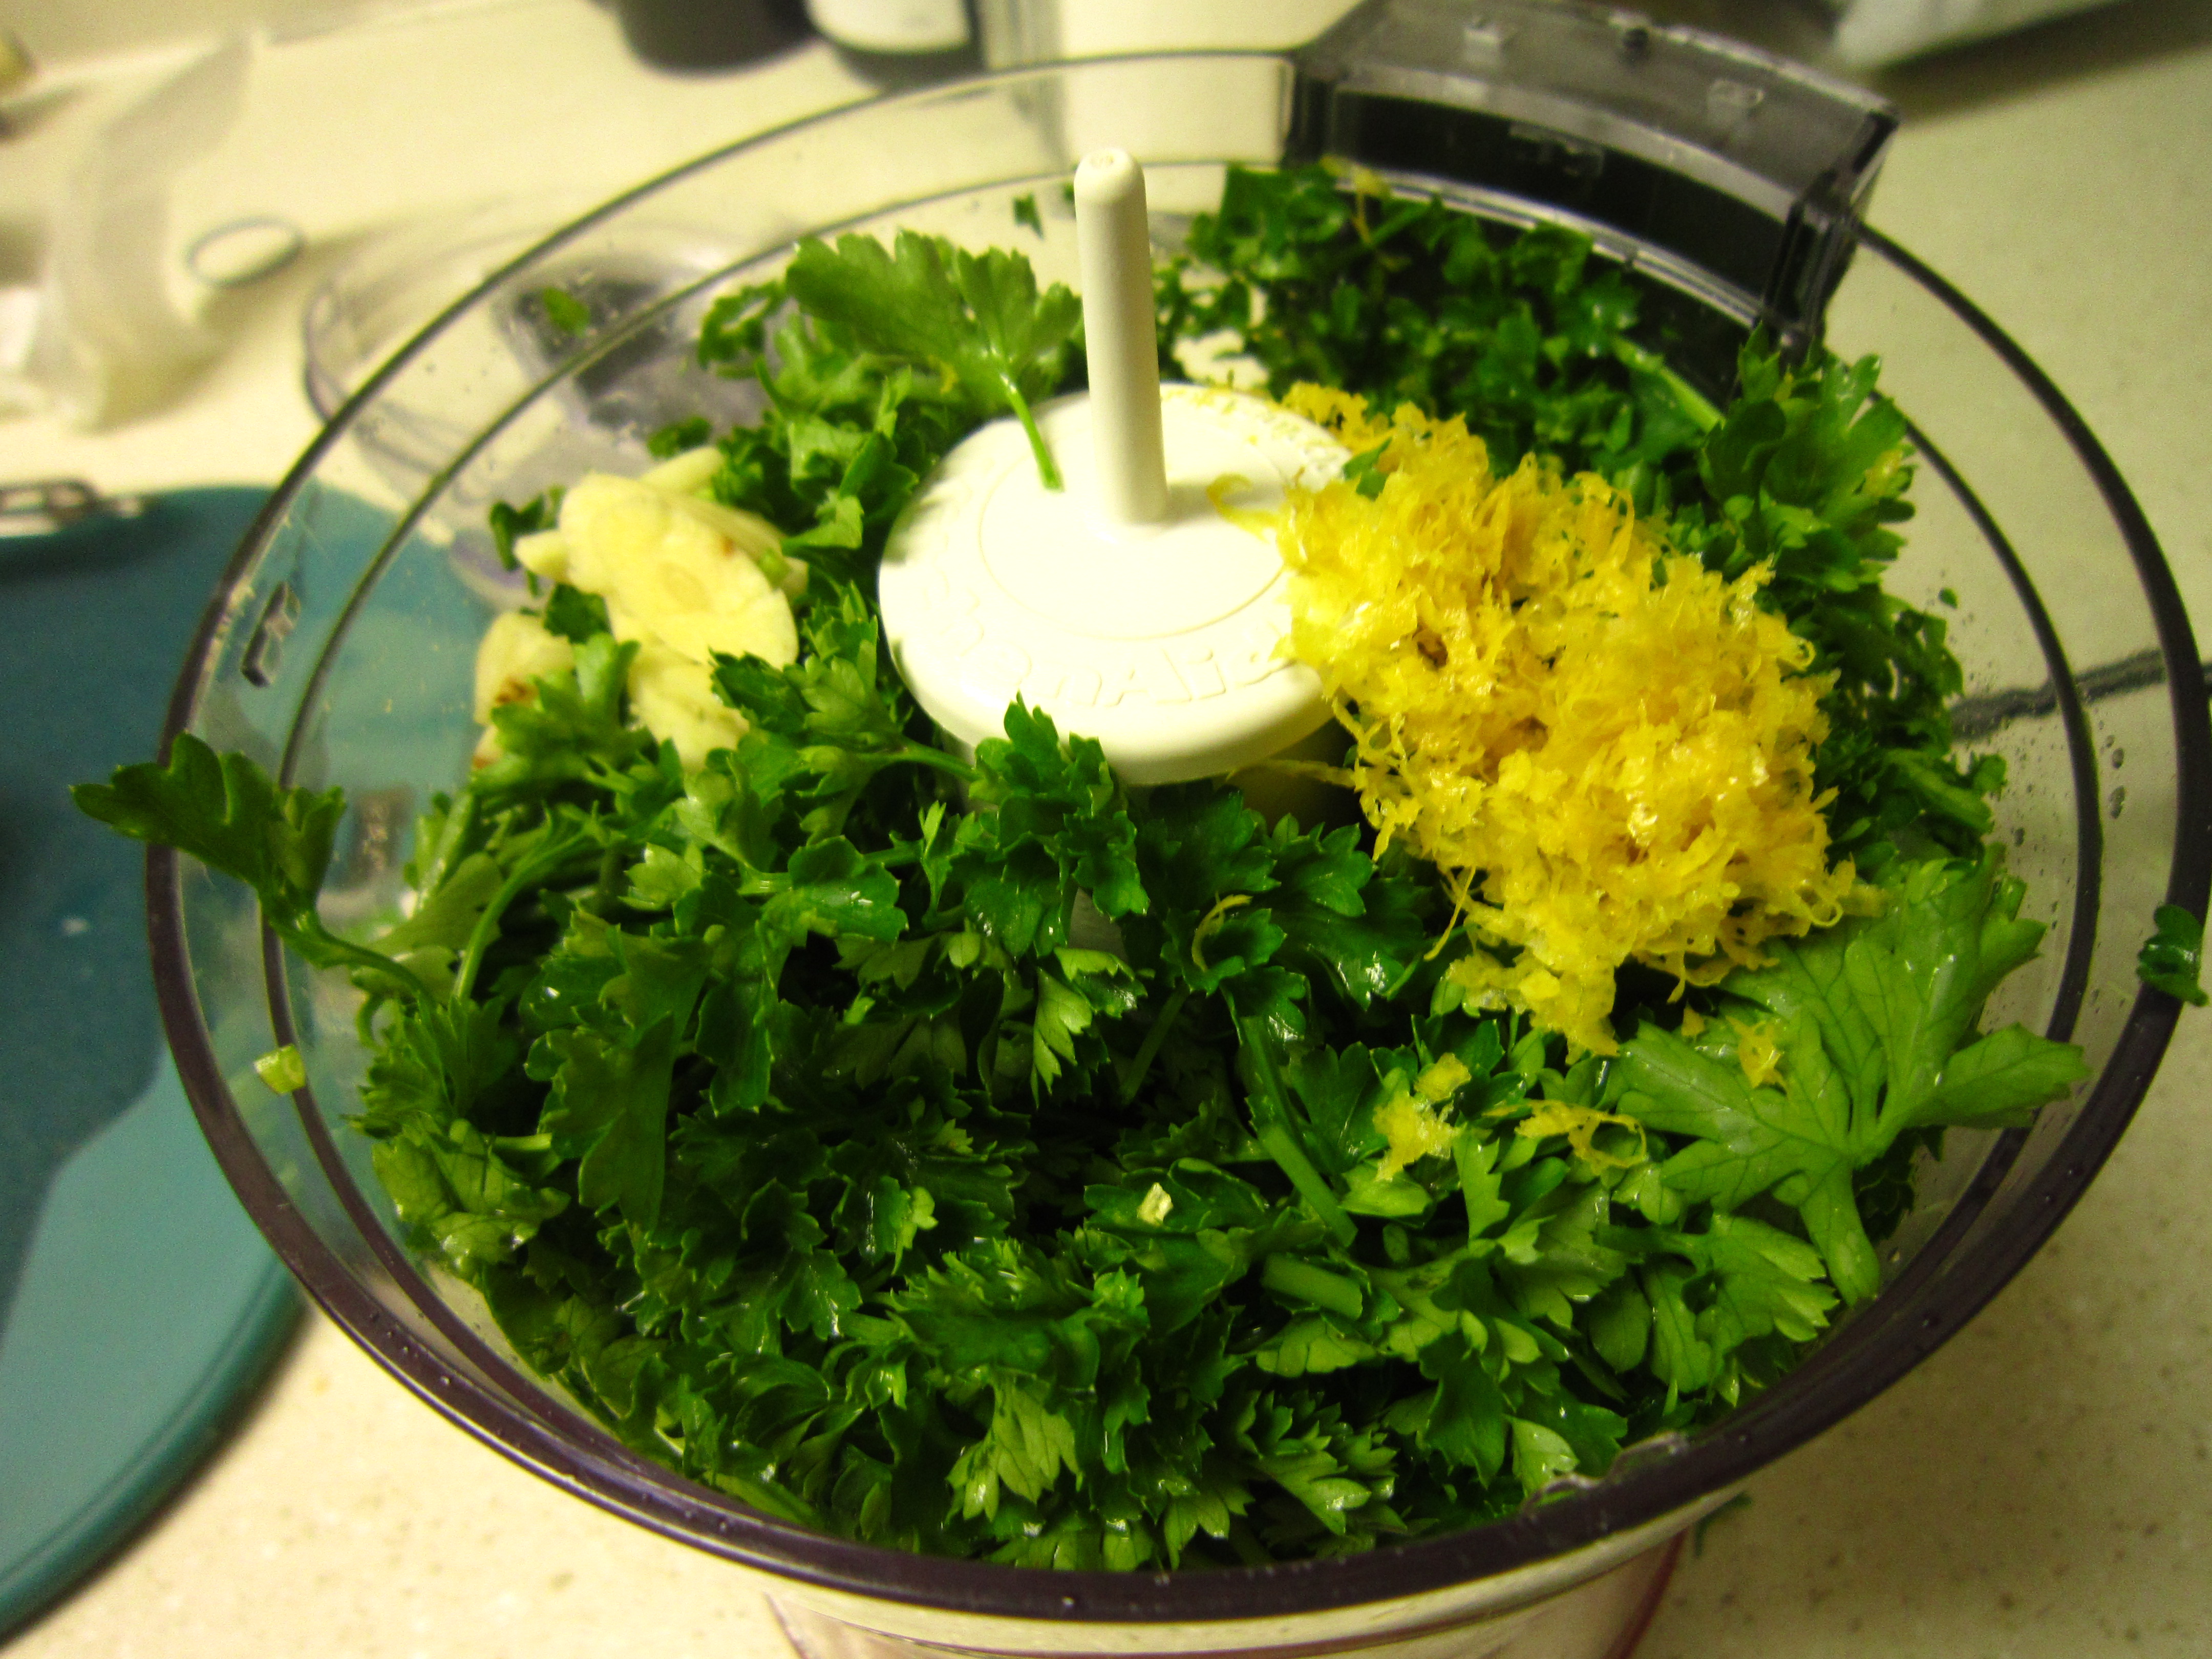
4 medium-large ripe avocados
1/2 cup basil, rough chopped
1 lemon, zested and juiced
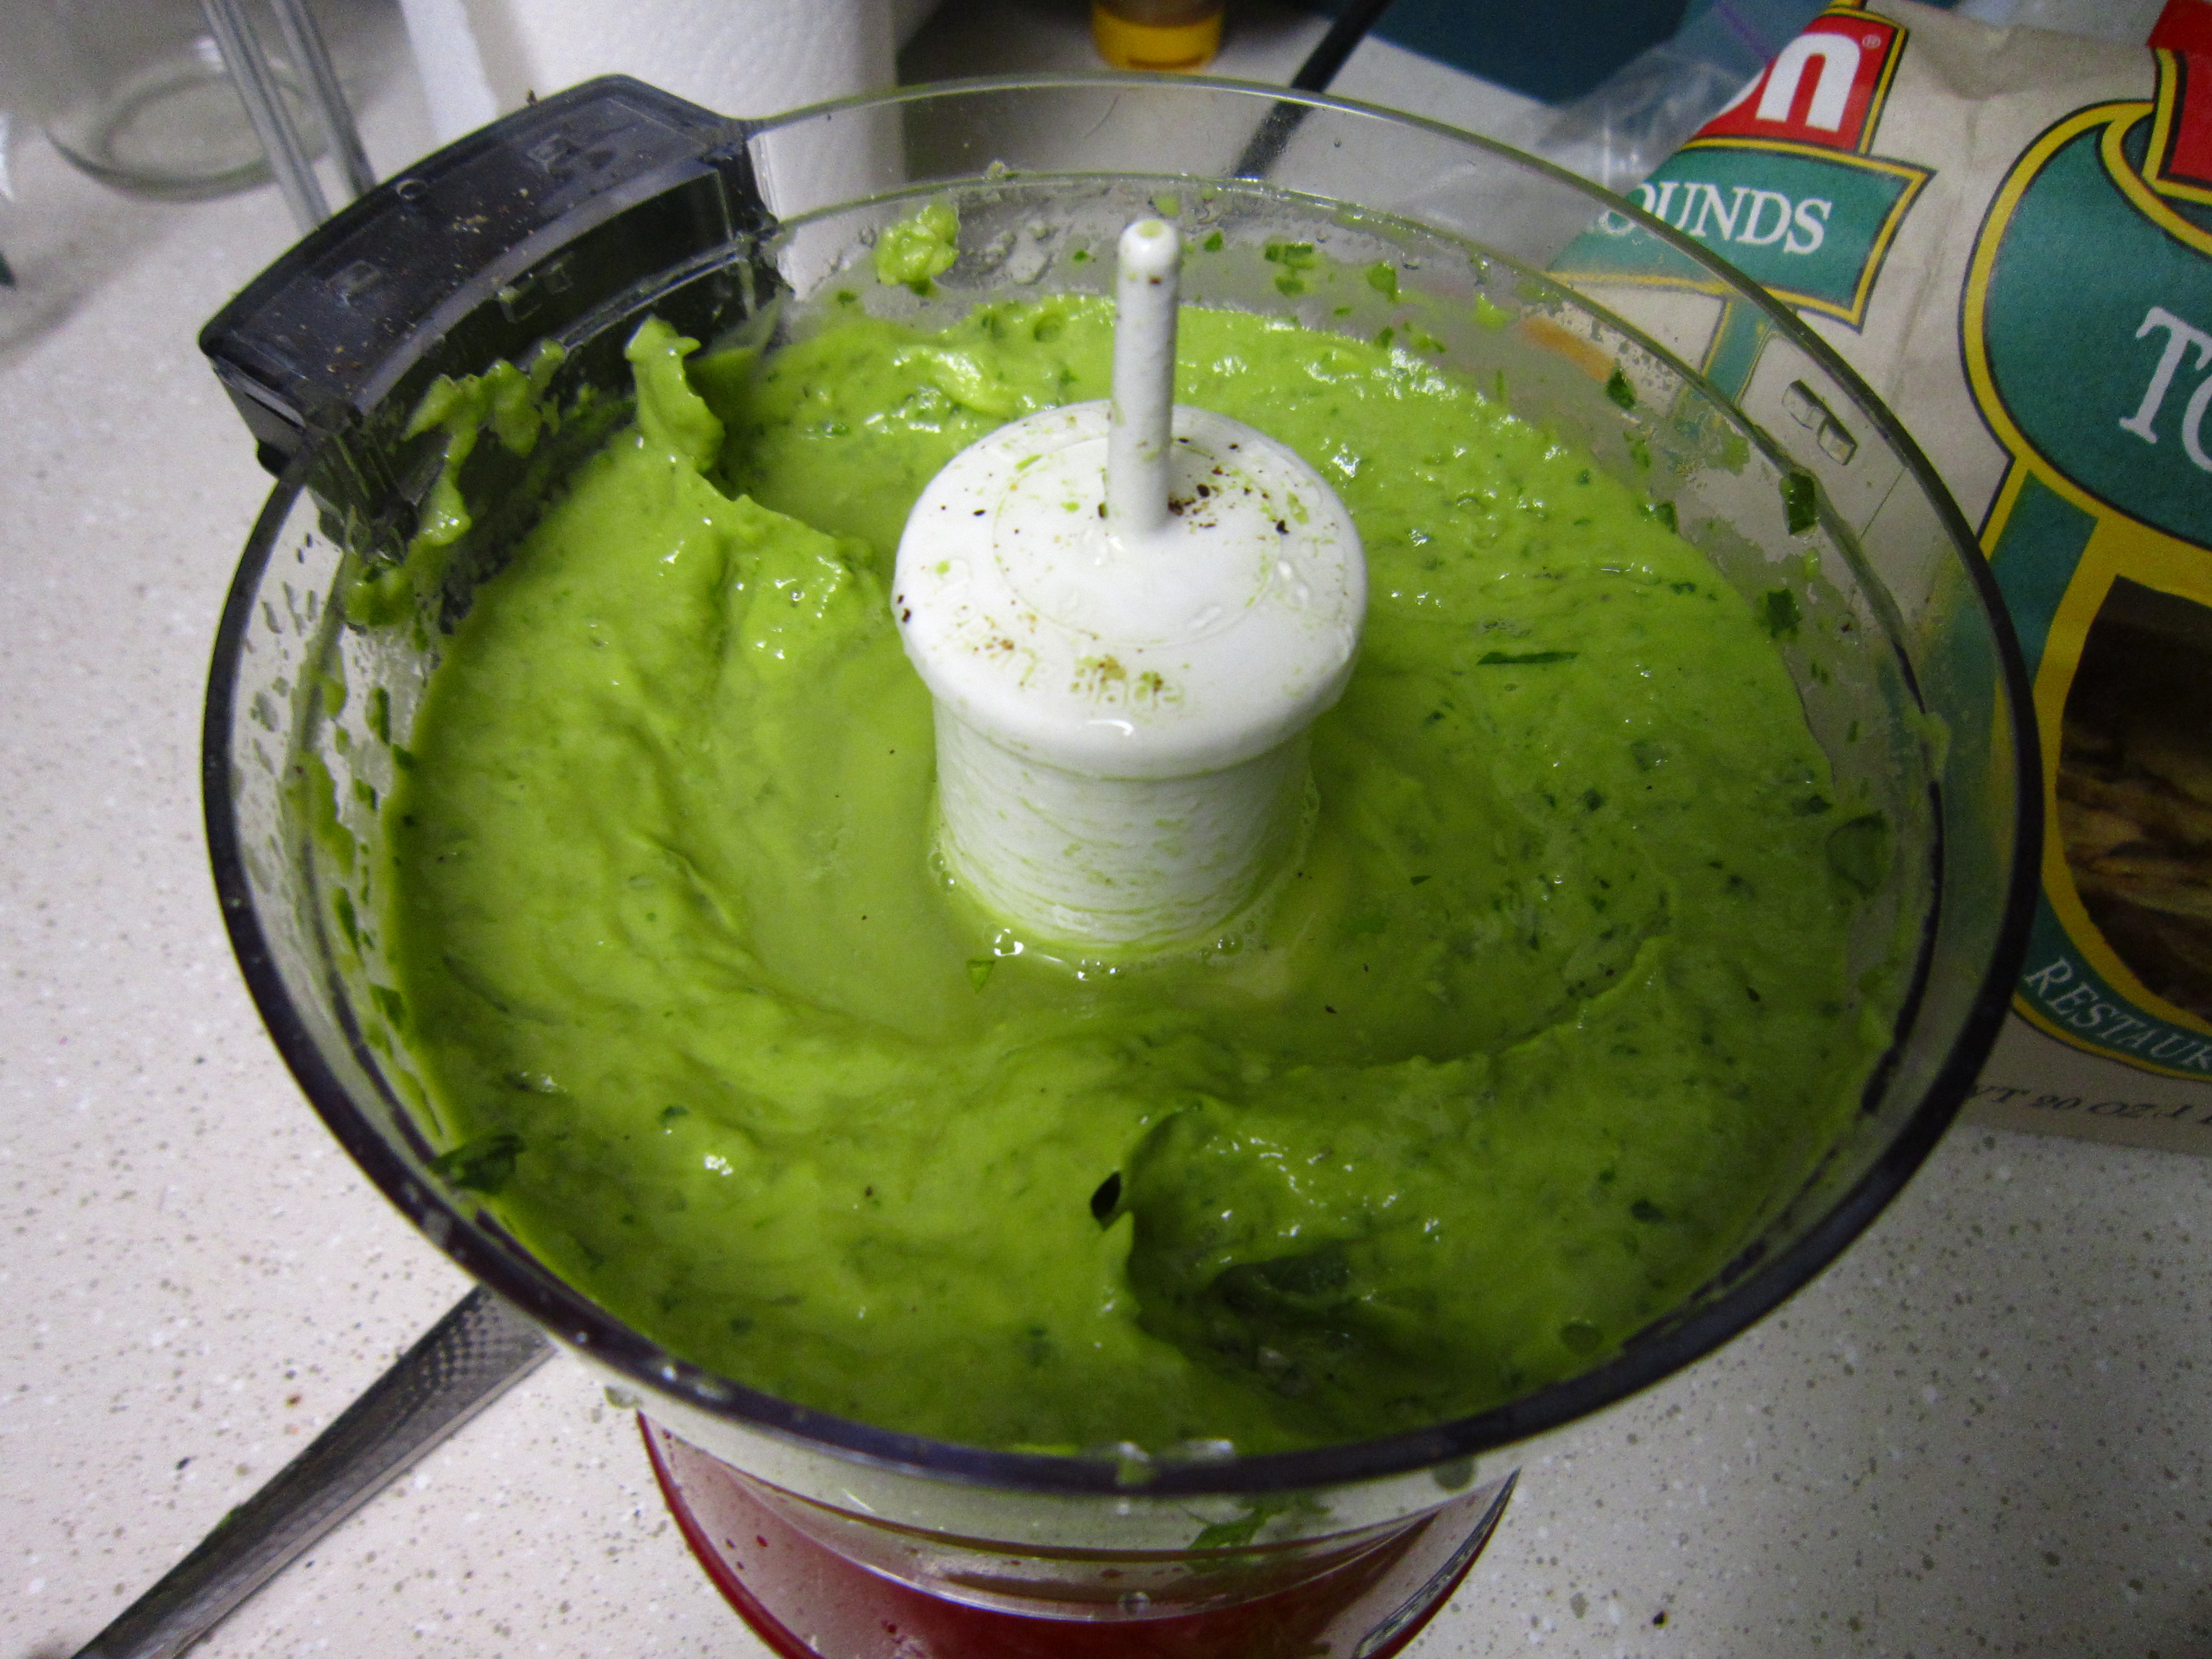
IMG_3760
2 tbsp olive oil
salt and pepper

– Rinse wheat berries and drain. Add chicken stock and water to wheat berries and bring up to a boil. Reduce heat, cover and simmer for about 1 hr till almost all of the liquid is gone. Remove wheat berries and place in a mixing bowl; reserve any leftover liquid on the side
– In a food processor or blender, combine avocados, basil, lemon zest and juice and olive oil. Puree until smooth. If the puree is too thick add in some of the reserved liquid from the wheat berries. Season liberally with salt and pepper
– Spoon puree over wheat berries, reserving 1/4 cup of the puree for the fish

Basil and panko crusted halibut

6 halibut fillets

  • If you’re portioning the halibut yourself, I normally do 6oz-7oz a person, so for 6 people you would need approx. 2 1/4- 2 1/2 lbs of fish

1/4 cup avocado and basil pureeIMG_3762
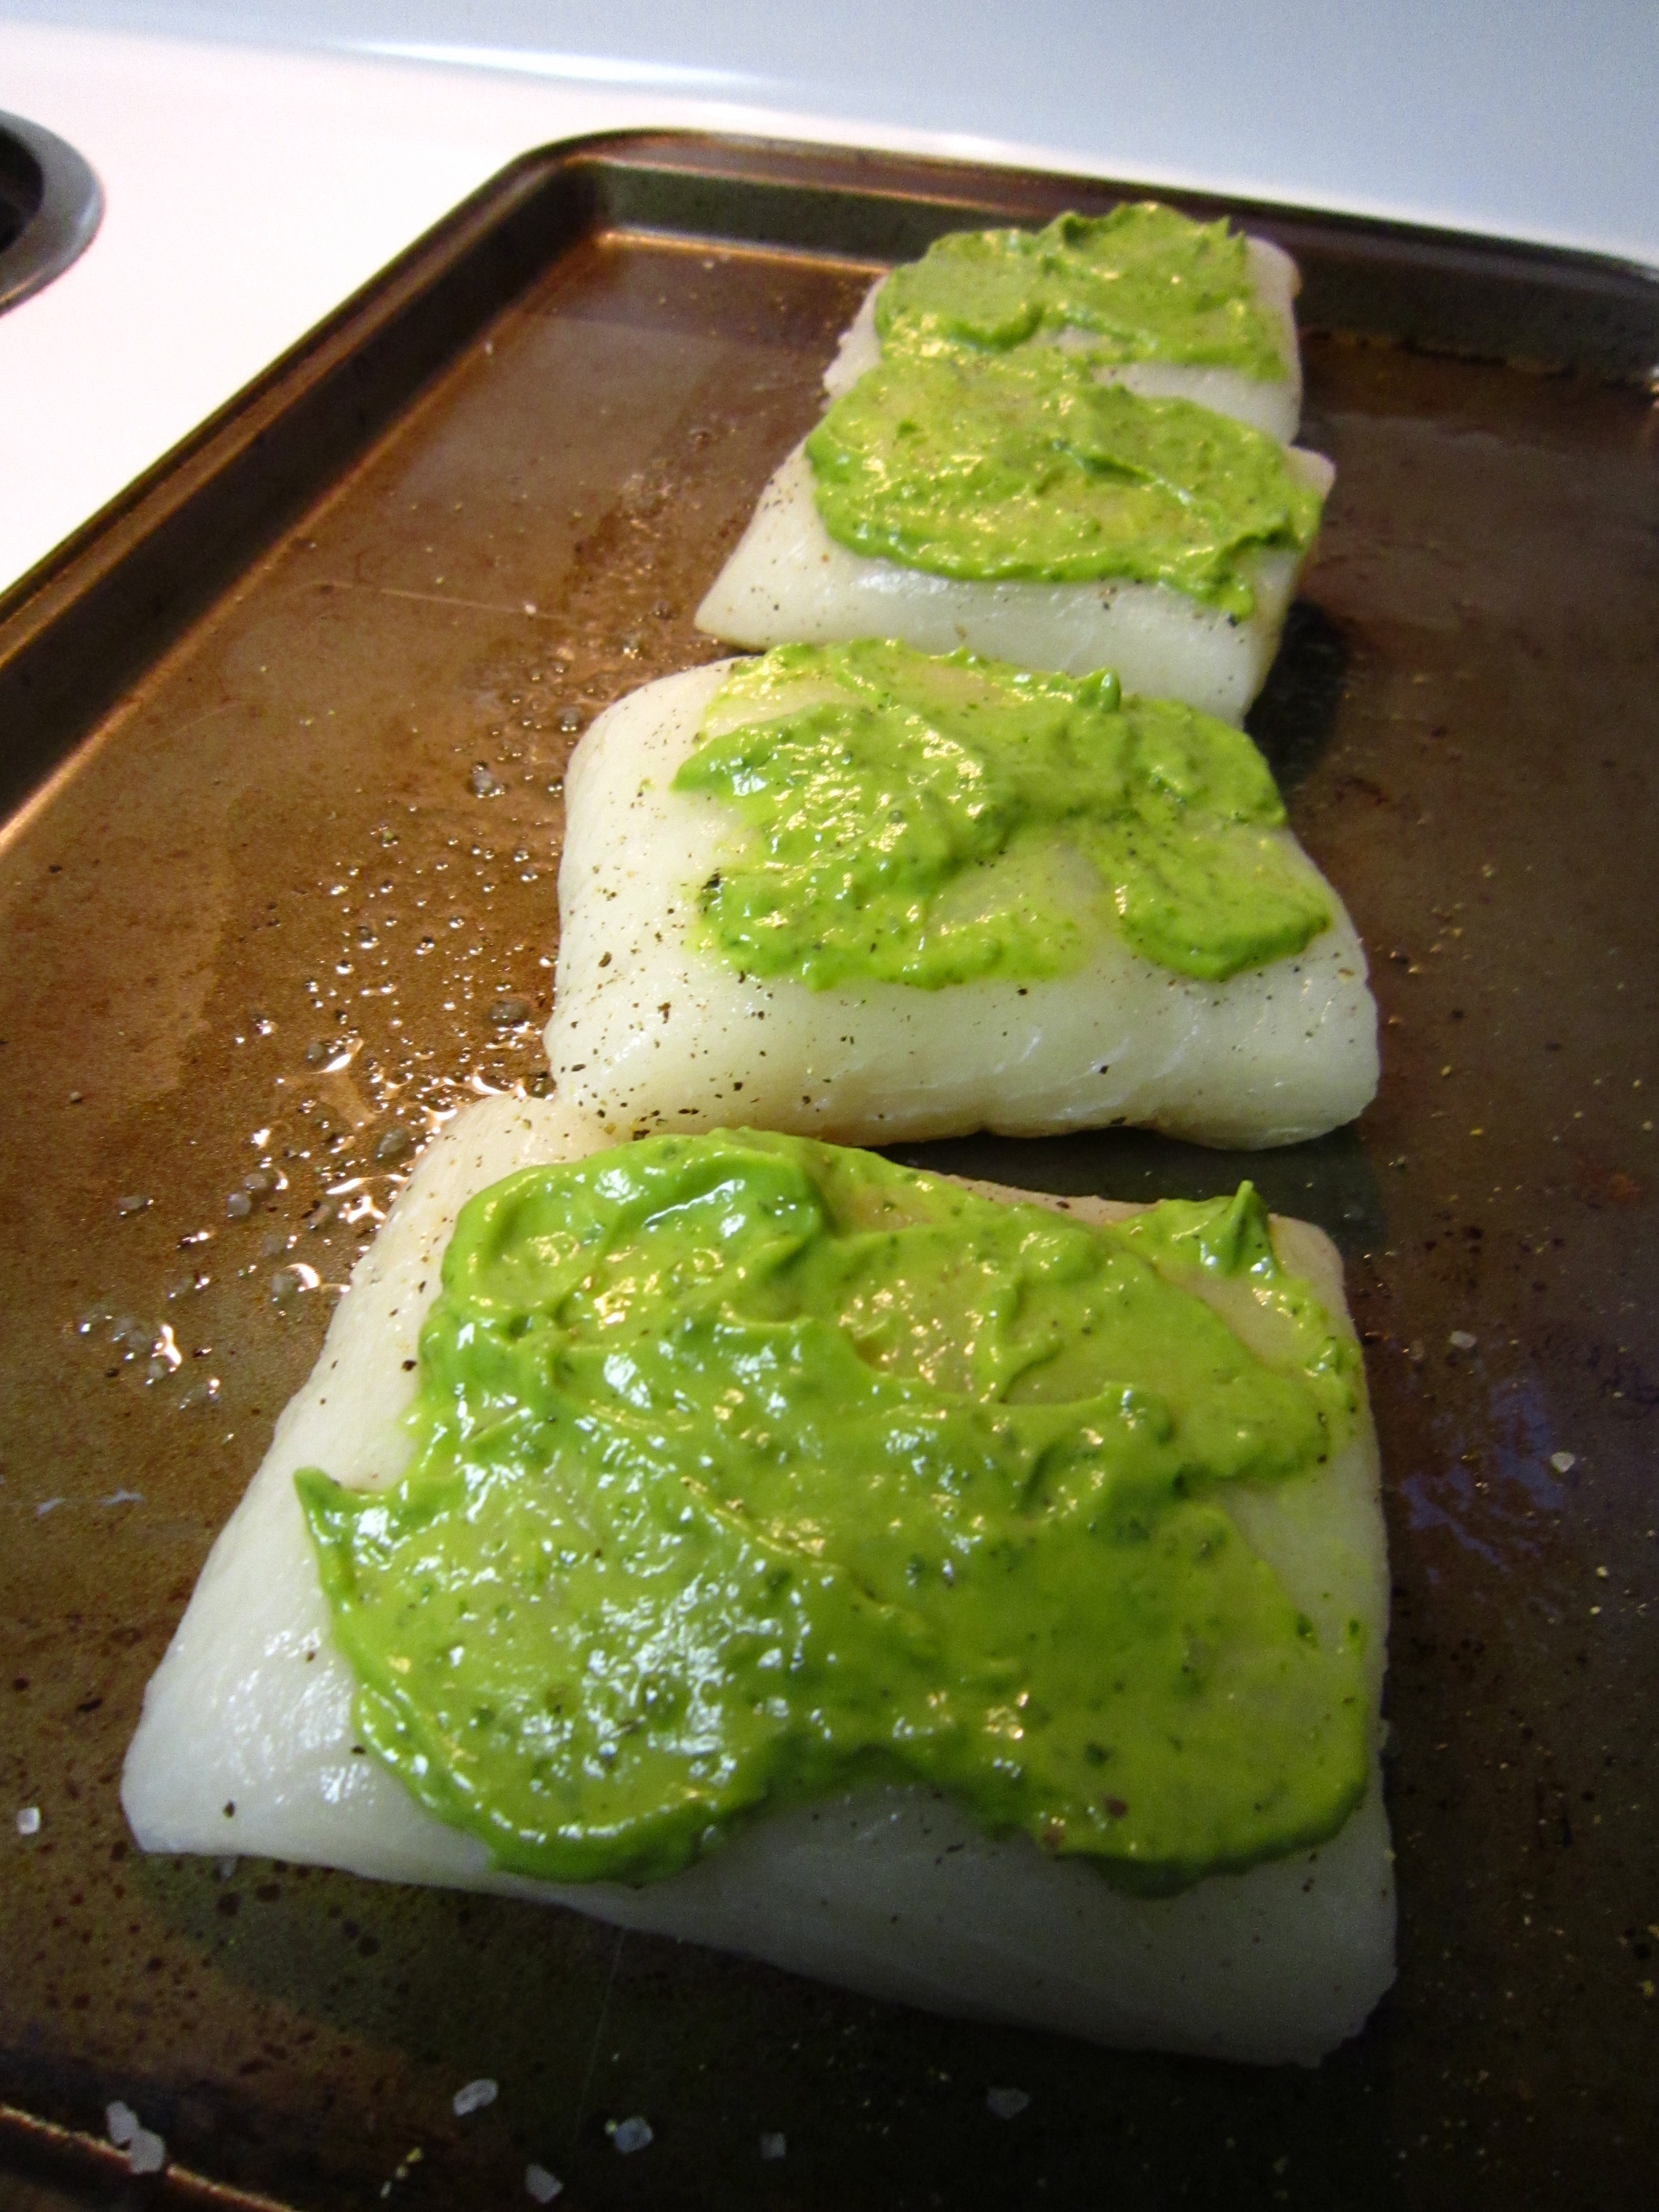
3 tbsp butter, melted
1/2 tbsp garlic powder
1/4 cup bread crumbs
1/4 cup panko
1 tbsp basil, finely chopped
salt and pepper
olive oil

– Heat oven to 400 degrees. Place baking tray in the oven to heat the tray
– While the tray is heating, mix together the butter, basil, garlic powder, bread crumbs, and panko in a small bowl
– Season the halibut with salt and pepper on both sides and spread the avocado and basil puree over the top of each fillet
– Spoon the bread crumb mixture on top of the puree and lightly press down
– Remove the baking tray from the oven, drizzle the tray with olive oil, and place halibut fillets on the tray, topping side up. IMG_3765Place a sheet of foil over the fish and bake for 10-15 minutes depending on the thickness of the fish
– Remove foil for the last few minutes so topping gets nice and brown; you can also turn the oven to broil to quickly brown the topping if you’re worried about the fish getting overcooked

herbed quinoa, pan-roasted halibut

 photo-33

Qunioa is one of those grains that have have become very popular lately because of it’s health benefits: it’s gluten free, high in fiber and protein (it’s actually a complete protein), and cholesterol-free, but it also has a great texture and taste, and can soak up other flavors quite well. Here I mix cooked quinoa with a herb “sauce” and serve it with some sauteed asparagus and pan- roasted halibut

Herbed Quinoa
This quinoa would also go great with other proteins such as chicken, fish, or steak, or just mix it with some tomatoes, cucumbers and feta for a take on a tabboulleh salad

4 cups cooked quinoa (about 2 cups uncooked)IMG_3742
1 bunch curly parley, roughly chopped
1 cup chopped basil
2 cloves garlic, roughly chopped
1 lemon, zested
2 tbsp lemon juice
2 tbsp chicken or vegetable broth
2 tsp soy sauce
salt and pepper
~1/4 cup olive oil
2 tbsp unsalted butter, melted (optional)IMG_3743

  • I just like the butter because it adds richness to the mouthfeel, but you can easily leave it out. If you’re mixing the quinoa into a cold salad, I would leave it out

– Combine herbs, garlic, lemon juice, chicken broth, and soy sauce in a food processor. Pulse till evenly mixed
– With food processor running, drizzle in olive oil and melted butter, scraping down the sides every so often, so it forms a smooth consistency. You want the texture to be quite loose- somewhere between a pesto and vinaigrette
– Season liberally with salt and pepper, as this is the only seasoning the quinoa will have on it
– If the quinoa is cold, re-heat before mixing the sauce onto it, otherwise the butter may solidify. Mix to coat quinoa evenly and serve

Pan Roasted Halibut with Brown-Butter Caper Pan Sauce(4 servings)
This sauce goes well with pretty much any white fish: rock fish, cod, halibut, swordfish..so just choose whatever looks freshest at the market

~2 lbs fish, or 4 fillets
1/4 cup butter
4 garlic cloves, smashed
1/2 cup white wine
chicken or vegetable broth
1/2 lemon
1 tbsp capers
olives (optional)

  • Chopped up olives go great in this simple pan sauce if you have some on hand. I like using green castelvetrano olives if I have them, because they have a nice meaty texture and buttery taste and aren’t too briny

salt and pepper

– Season fish with salt and pepper. Heat oil in a large skillet over medium-high heat. Cook fish as you normally would, but remove it from the pan a few minutes before it is done and set aside
– Add butter and smashed garlic to the pan and cook until butter is browned. Squeeze lemon juice into the pan and add wine to deglaze
– If the wine immediately evaporates add enough stock to form a sauce. Add in capers and chopped olives and adjust seasoning if necessary
-Return fish and any juices to the pan cook fish for another 2-3 minutes to finish them off before serving. Spoon sauce over fish

corned beef and irish potato cakes

photo-25

Corned beef tends to get associated with St. Patrick’s day, but in reality it’s an easy anytime meal, just throw it in a slow cooker or a dutch oven. I remember eating corned beef as a kid, always with cabbage, carrots, and potatoes, and I can’t say I was really fond of all the boiled stuff, so here I made Irish potato cakes, a cross between a hash brown and mashed potatoes, to substitute the boiled potatoes, and just sauteed up some local kale rabe

Slow Cooker Corned BeefIMG_3673 (~6 servings)

1 3-4# corned beef and spice packet
1 12 oz bottle guinness
1 cinnamon stick
4 whole cloves
2 bay leaves
1/2 onion, slicedwater to cover corned beef

-If you’re using a slow cooker combine all ingredients in the slow cooker, adding a little water or stock if more than 1/2 an inch of the corned beef is sticking out of the liquid, and cook corned beef on high till tender, depending on the size, about 4-5 hours. If in doubt, just cook it longer; rather have it be falling apart than chewy. My corned beef barely fit in my small slow cooker so I turned it over halfway through cooking it to make sure it cooked evenly

IMG_3677

Irish Potato Pancakes (makes ~16 pancakes)IMG_3674

3# yukon gold potatoes (just round to the nearest whole potato)
3/4 cup milk
1/3 cup flour
1 egg
3/4 cup shredded cheddar cheese
butter
pepper
salt

IMG_3675– Peel potatoes. Cut 2/3 of the potatoes into quarters and place in a pot of water. Bring potatoes up to a boil, and then simmer until tender
– Grate the remaining potatoes on the large side of a box grater. Sprinkle with 1 tsp kosher salt and place in a strainer
– When potatoes are tender, drain water and add 1/4 cup milk and mash till smooth. Season with salt and pepper
– Press grated potatoes to get out extra moisture and then add to mashed potatoes. In a separate bowl, whisk together 1/2 cup milk, egg, and flour till smooth and then add to mashed potatoes. Mix well and then add cheddar cheese
– Heat a large skillet over medium heat with 1 tbsp butter. Scoop 1/4 cupfuls of batter into pan and spread to desired thickness

  • Spread batter thinner for crispier pancakes, or leave them fatter for more mashed potatoey onesIMG_3676

– Cook pancakes about 4-5 minutes per side, or until nice and browned. Remove pancakes from pan and place on a baking sheet in the oven at 150 degrees to keep warm. Melt another tablespoon of butter in the pan before cooking the next batch


* Experiment with the ratio of mashed potato to shredded to potatoes to get different textures and try out other types of cheese to find your favorite. You can also add bacon, green onions/chives.

beans and greens

IMG_3664

It may not win any awards for being pretty, but it’s a hearty, delicious one-pot meal.

Beans and Greens

1 onion, small dicedIMG_3659
4 cloves garlic, finely chopped
2 lbs cabbage (or just one small head)
1 quart chicken stock
parmesan cheese rind (optional)
1 lb italian style pork sausage

  • Feel free to use sweet, mild, or hot sausage. If you purchase sausage already in casings, just the end of casing and squeeze the sausage filling out of the casing. Turkey sausage would also work, and so would chicken, but you’ll probably have to slice up the chicken sausage, because it normally doesn’t break up like turkey or pork sausage

1 can great northern beans, drained and rinsed
2 cans cannelini beans, drained and rinsed
1 can butter beans, drained and rinsed

  • You can use all or just one or two types of white beans; I just like the different sizes and flavors

1 head mustard greens, kale, collard greens, or swiss chard, cut into 1/2″ pieces
2 lbs broccoli (or 3 heads)
2 tbsp butter
salt and pepperIMG_3657

– Heat olive oil in a large pot over medium high heat. Add onion and garlic
– Cut the cabbage into quarters and remove the core. Julienne cabbage, aka cut into a thin strips and add to the onions and garlic
– Deglaze pot with the chicken stock and cook cabbage for 20 minutes. If you have a parmesan rind add it in now; it’ll slowly melt as it cooks. I normally take it out before I add the greens. If you leave it in remember it’s in there and don’t it
– Add sausage and break up into pieces. Add all of the beans and continue cooking over medium-low or medium heat

  • Cooking the sausage in the stock allows all the flavors in the sausage to flavor the cabbage and stock

– While sausage and beans are cooking, cut up the broccoli into florets. Remove the broccoli stem, but rather than just cutting the broccoli into florets from the top, split the broccoli stems, and then pull apart the florets; this creates a lot less mess. Slice up the broccoli stemsIMG_3661IMG_3662
– Once sausage is cooked, add the mustard greens and cook until wiltedIMG_3660
– Add the broccoli and butter and cook until broccoli is tender, about 10 minutes

  • If you’re not going to eat the ragu right away, hold off on adding the broccoli, or add the broccoli, but only cook it over the heat for 5 minutes

sweet potato chili

photo-16

Serve with quinoa and garnish with some sour cream and feta cheese and you’ll have a hearty, healthy meal perfect for cold nights, or just about anytime! You could probably just eat the chili by itself, but I enjoy eating it with quinoa,or bulgur, because they’re not as dense or heavy as rice, but it’s chili, you gotta have some kinda carbohydrate with it 😉

Sweet Potato Chili (makes about 10-12 servings)

The Base
1 lb bacon, cut into 1/2″ pieces
1 onion, small diced
5 large cloves garlic, finely chopped
12 oz oatmeal stout or brown/amber ale
3 tbsp soy sauce
1 tbsp smokey paprika
2 tbsp chili powder
2 tbsp siracha
2 tbsp brown sugar
1/2 tbsp ground cuminIMG_3643
1/2 tbsp garlic powder

The Goods
2 cans sweet corn, drained
2 cans diced tomatoes with juices
1 can kidney beans, drained and rinsed
1 can black beans, drained and rinsed
1 can garbanzo beans (chickpeas), drained and rinsed
2 1/2-3 lbs sweet potatoes or yams, peeled and cut into 1/2″ cubes- you just want them all about the same size so they cook evenly

  • weight doesn’t need to be exact, just round to the nearest whole potato

4 cups water, or 2 cans full
salt and pepper

– Cook bacon in a large stock pot over medium high heat until almost crispy. Drain 3/4 of the excess oil off and add onions and garlic
– Cook onions until translucent. Deglaze pot with just enough beer so that you can scrape off all of the delicious brown bits off of the bottom of the pot
– Add spices and seasonings and cook for another 5 minutes. Add in the rest of the beer and then begin adding in all of “The Goods”, except for sweet potatoes
– Bring chili up to a boil over high heat, then add in sweet potatoes
– Once chili returns to a boil, turn the heat down to medium-low and simmer until sweet potatoes are tender about 30-45 minutes, and their starch starts to thicken up the chili
– Season with salt and pepper; add more siracha (or hot sauce) if you want it spicier; add more brown sugar if you want it sweeter
– Ladle into bowls, sit in front of the fireplace or outside on a porch and bon appetit!

IMG_3644

awesome veggie-tized mac n’ cheese

photo-8

The addition of a bunch of veggies not only adds color and texture, but also makes this comfort food meal healthier, and super delicious!

Veggie-tized Mac n’ CheeseIMG_3621
This recipe makes a lot of mac n’ cheese; enough for 12-15 servings…or a couple days worth of lunches and dinners 🙂

1 lb bacon, cut into 1/4-1/2 in pieces
1/2 onion, small diced
4 large garlic cloves, finely chopped
1 lb fusili, penne, gemeli, ziti, or macaroni pasta

  • Feel free to use your favorite type of short, curly pasta. You just want something curly to hold the cheese sauce

3 large carrots
2 cups frozen peas
1# frozen chopped spinach, thawed
1 head cauliflower
1 recipe Cheddar Cheese Sauce (see recipe below)IMG_3625
couple handfuls of shredded Parmesan cheese

– Cook pasta in a stock pot, because this will also act as your mixing pot. Cook pasta according to package directions. While pasta is cooking start on bacon and cauliflower
– Once pasta is done, add spinach, peas, and carrots to hot pasta and stir well.
– Cook bacon over medium to medium-high heat until almost crispy. Add in onions and garlic and continue cooking till onions are translucent and bacon is crispy; strain off extra fat and dump bacon into pasta pot (a little bacon fat is okay!)

Prepping the Cauliflower
– Remove extra leaves from stem of cauliflower. Using a pairing knife, cut around the stem at an angle towards the center of the cauliflower; this will make it a lot easier to cut the cauliflower into florets. Cut the large pieces of cauliflower into small florets, about 1/2″. When cutting the cauliflower, cut from the stem and use the knife blade to break the cauliflower apart; this will decrease the amount of cauliflower “crumbs” that form and give you nice florets
– Blanch cauliflower in salted, boiling water for 3-5 minutes till al dente, you want them to still have a little bite. Strain cauliflower and dump into pasta pot with pasta and bacon

IMG_3626IMG_3627

IMG_3628IMG_3630

– Pour cheddar sauce over pasta, bacon and veggies and stir well
– Preheat oven to 425 degrees
– Grease a 4qt baking dish and pour mac n’ cheese into baking dish. Top with a couple handfuls of parmesan cheese. If you’re not eating til later, store mac n’ cheese in the fridge like this. Otherwise, pop it in the oven and cook for 10-15 minutes to make sure everything is hot and the cheese is nice and bubbly and starting to brown

IMG_3632 IMG_3633

Cheesy Cheddar Sauce

1/2 stick unsalted butter (2tbsp)
2 tbsp olive oil
~1/4 cup flour
3 1/2 cups milk (feel free to substitute in half and half or cream)
1 lb extra sharp white cheddar, cut into cubes
1 tbsp dijon mustard
1/2 tbsp siracha
salt and pepper

– Melt butter and olive oil in a sauce pot over medium heat
– Sprinkle in flour, stirring constantly, until the roux looks like wet sand. Cook roux for another 5 minutes; turn heat down to medium-low if a film begins to form on the bottom of the pot
– After 5 minutes, switch to a whisk and slowly start to add in the milk, whisking to prevent lumps. Add dijon and siracha
– Return heat to medium-high and slowly bring to a boil. Continue cooking until sauce thickens
– Turn heat down to medium-low and add cheese in portions, whisking till smooth
– Season with salt and pepper. Hold over low heat if not ready to pour on pasta

  • If the sauce seems to thick feel free to add a little more milk to loosen it up

IMG_3634

Apricot-cider glazed salmon, crispy roasted potatoes

photo-11

Dress salmon, or chicken, up with this simple glaze, serve with your favorite veggies and starch and voilà!

Crispy roasted potatoes

~2 lbs easter egg potates, halved or quartered depending on their size

  • They’re called easter egg potatoes, because they come in several different colors, but fingerling potatoes would work just as well, or even red potatoes cut in quarters

10-12 small garlic cloves, very rough choppedIMG_3614
couple sprigs of thyme
olive oil
salt and pepper

– Preheat oven to 400 degrees
– Wash and cut potatoes and place in a large bowl. Drizzle with olive oil and add chopped garlic and thyme
– Season liberally with salt and pepper and toss potatoes to make sure they are well coated. Dump potatoes onto a large baking sheet
– Cook potatoes for 20 minutes at 400, then turn heat up to 425, stir potatoes, and continue cooking for another 10-15 minutes till tender when poked with a fork

  • you may have to use a spatula to scrape the potatoes off of the baking sheet, but that’s okay, because that’s how you get the crispy brown sides

Apricot-Cider Glazed Salmon

apricot-cider glaze (see recipe below)IMG_3615
4 salmon filets (~6oz each)
olive oil
salt and pepper

– Heat olive oil in a large saute pan over medium-high heat until oil begins to “shimmer”, just before it starts smoking

  • by “shimmer” I mean that when you tilt the pan from side to side the oil will ripple, making it look shiny. This is when you should add the fish to get a nice sear and make sure your fish doesn’t stick to the pan. If you wait until the oil starts smoking the quality of the oil begins to break down and you’re more likely to start a fire if oil splatters when you add your food

– Season salmon with salt and pepper and add to pan. Cook salmon for 5 minutes before flipping over to other sideIMG_3617
– After about 3 minutes drizzle 1/2 of the glaze over salmon fillets and continue cooking for another 3-5 minutes depending on whether you want your salmon medium or well
– Remove salmon from the pan. Add in the rest of the glaze on cook for 1-2 minutes to reduce. Drizzle reduced glaze over salmon and serve

For the glaze: (enough for 4 salmon filets)
1/2 cup cider vinegar
1/4 cup brown sugar
2 tbsp apricot jelly (pineapple and peach would also work)
1/2 tbsp dijon mustard
1 tsp thyme chopped
1/2 tsp red pepper flakes
pepperIMG_3616

– Combine cider vinegar, sugar, jelly, and mustard
– Microwave for 45 seconds to melt jelly and sugar
– Add in remaining ingredients and mix well

  • Glaze will keep in the refrigerator for about a week before the thyme starts going bad, but if you use dried thyme, or add the fresh thyme in later, the glaze can probably keep for longer

photo-9

eggplant steaks w/ spinach, sun-dried tomato topping

photo-12

Eggplant Steaks w/ spinach, sun-dried tomato toppingIMG_3604

3 large eggplants (cut into about 10-12 steaks)
1/2 onion, small diced
1 bell pepper, small diced
4 large cloves garlic, minced
1 lb frozen spinach, thawed
1/2 cup sun-dried tomatoes, rough chopped
1 cup shredded parmesan
balsamic vinegar
olive oil
salt and pepper
ref pepper flakes

IMG_3601

IMG_3602


– Pre-heat oven to 400 degrees
– Cut off top and bottom of eggplants. Then cut them into 1/2″ thick steaks, vertically. You can get about 2-3 steaks out of one eggplant. Keep the eggplant trim and dice it up to use in the topping
– Line a baking sheet with foil. Arrange eggplant steaks on the baking sheet. Drizzle both sides of eggplant with olive oil and season with salt and pepper. Lightly drizzle with balsamic vinegar
– Bake eggplant for 10-15 minutes, till tender. Then set aside
– Heat a large skillet over medium-high heat. Saute onions, garlic, and red pepper flakes till the onions begin to turn translucent
– Add diced eggplant and bell pepper and cook till tender
– Add spinach and sun-dried tomatoes and parmesan cheese
– Season with salt and pepper
– Divide topping amongst eggplants. If you need to, pop the topped eggplant steaks back into the oven and broil for a few minutes to reheat

IMG_3605IMG_3607IMG_3608


IMG_3610

you’ll never miss the meat!


Belated chinese new year: crispy pork belly w/ bao and beef broccoli cake noodle

IMG_1966 IMG_1965

Crispy Pork Belly

IMG_3591
braised pork belly (see recipe below)
bao buns
hoisin sauce
siracha
cilantro, rough chopped
green onions, sliced
assorted condiments: kim chee, namasu (cucumber/carrots), takuan

– Once pork belly is chilled, trim ends and slice into desired thickness. Brown slices on all sides in a pan until golden and crispy. Drain on paper towels
– Set up a build-your-own-bao bar and get creative with your condiments!

IMG_3587IMG_3589
Braised Pork Belly
1 piece pork belly, 2-5 lbs

  • if you’re getting your pork belly from a butcher ask for a thicker cut

2 bay leaves
1/2 tbsp whole peppercorns
1 onion, cut into large sections
10 whole cloves
3 star anise
1/2 cup soy sauce
water

– Combine pork belly with all spices and onions in a large heavy-duty pot. Add enough water to cover pork belly
– Bring to a boil over high heat. Turn heat down to low/medium-low, cover, and simmer pork belly for 2 hoursIMG_3580

  • Keep the pork belly in 1-2 pieces; it shrinks a lot when cooked. If you have to, cut the pork belly in half so it will fit in the pot. If you don’t have a pot large enough to hold the pork belly you can cook it in a roasting pan in the oven at 350 for 3-4 hours till tender.

– Remove pork belly from the liquid and place onto a baking sheet lined w/ foil or parchment paper. Cover pork belly with another sheet of foil and a baking sheet. Place a heavy weight (the pot filled with liquid would work) on top of the pork belly and chill overnight, or at least 5-6 hours for the pork belly to flatten out and firm up

  • If you use the pot as a weight, once the liquid is chilled you can easily skim off the fat, strain out the spices, and use the broth as a soup or stew base

IMG_3594

Beef Broccoli Cake Noodle

~17 oz fresh egg noodle (or 3 pkgs of noodles) I used yakisoba noodles
sesame oil
canola oil
3 heads broccoli, cut into ~1/2″ wide florets, and stems thinly sliced
1/2 lb beef, thinly sliced into ~1″ pieces

  • I used frozen tenderloin scraps I had, but you could use virtually any cut of beef you like
  • Also, I did not make this dish a meat heavy dish, but you could easily increase the amount of meat if you wanted it to be

1 tbsp ginger, finely chopped
2 large cloves garlic, minced
1/2 cup soy sauce
1/4 cup brown sugar
1 tbsp sambal
2 tbsp vegetable or oyster stir fry
1/2 tbsp cornstarchIMG_3585

– Boil egg noodles for 2-3 minutes. Drain and lightly toss with sesame oil
– Heat enough canola oil to evenly coat the bottom of a large non-stick saute pan (or cast iron pan) over medium-high heat
– Add enough noodles to the pan so they cover the bottom of the pan and use a spatula to flatten out. Cook until browned, 3-5 minutes, then remove noodles from pan, add more oil, and brown other side. (WARNING: cake noodle is not a diet friendly dish)
– Meanwhile, in a large saute pan, or wok, heat ~1 tbsp oil canola oil over high. Wash broccoli before cooking and then dump into pan; the oil will SPLATTER, so be careful, but the extra moisture will help the broccoli cook without burning
– Cook broccoli for 2-3 minutes. Season beef with salt and pepper and then add to pan with ginger and garlicIMG_3593
– Cook beef for 2 minutes and then add remaining ingredients, except for cornstarch
– Once broccoli is tender and beef is cooked, mix cornstarch with water and slowly add to liquid in the pan till desired thickness is reached
– Pour beef broccoli over cake noodle and ENJOY! IMG_3584

IMG_0040

 belated GUNG HEE FAT CHOY!

creamy polenta w/ garlic shrimp

    IMG_2034 Creamy Polenta, garlic shrimp, easy tomato sauce (makes ~4 servings)

Creamy Polenta

2 cups water or chicken stock
2 cups milkIMG_2028
1/2 cup heavy cream

  • It’s not a lot of cream, but trust me, you won‘t even miss the butter or cheese. If you do, just add a handful of your favorite parmesan, goat, or cheddar cheese
  • Feel free to change the ratio of milk to cream if you want a richer polenta. I feel this ratio of 4:1 gives you a creamy polenta, without creating a dish with a 1000 calories

approx 2 cups polenta
salt and pepper to taste

  • I was taught to make polenta by sight; when you’re whisking the polenta into the liquid keep adding polenta until you can continuously see polenta. This method allows you to make polenta with whatever amount of liquid you want. Polenta is a very forgiving food; you can always add more liquid to thicken it up, and you can still eat it even if it’s very loose; it does thicken up a bit once it’s done cooking, too.

– Bring stock, milk, and cream to a boil. Whisk in polenta and turn heat down to medium. Continue whisking until polenta thickens up and begins bubbling. – Turn heat down to low. Season with salt and pepper and continue cooking until polenta is tender, about 8-10 minutes. If polenta becomes too thick before it’s done add in more liquid.

Garlic Shrimp w/ Easy Tomato Sauce

24-30 U 21/25 shrimp, peeled and deveined

  • feel free to use smaller or larger shrimp, adjusting the number of shrimp you need accordingly. I just use U21/25 because that’s what Costco has

IMG_20301 shallot, finely chopped
4 cloves garlic, minced
1 tsp fresh thyme, chopped
2 tbsp butter
olive oil
salt and pepper

2 cans diced tomatoes
1 1/2 tbsp soy sauce
1 tbsp basil, thinly sliced
red pepper flakes (optional

IMG_2029

– Heat olive oil in a large saute pan over high heat. Add shrimp in a single layer (if you can’t fit them all flat then cook them in 2 batches) and saute until they turn bring orange, about 2-3 minutes per side.
– Flip shrimp over and add in butter, garlic, shallot, and thyme. Season with salt and pepper and continue cooking until shrimp are done

– Remove shrimp from the pan and set aside. Reserve garlic butter in the pan for tomato sauce
– Add the diced tomatoes, with juices, soy sauce, and basil to the pan. Keep pan over high heat and reduce the liquid down till becomes more sauce like. Adjust seasoning if necessary

– Remove pan from heat. Either add the shrimp back to the sauce and serve over polenta, or keep the shrimp and sauce separate

IMG_2031IMG_2032

IMG_2036